
The idea for my “Firdemu” came about while I was painting “Lunch At The Stevensburg Cafe”. I had an image in my mind of a creature that was a combination of the dinosaurs in the painting and an Emu but hadn’t come up with a name for my creature.When a friend made a typo error calling her birds “firds” I added fird to emu and came up with “Firdemu”.
I hope you enjoy seeing how I created my “Firdemu”.

This is a list of some of the things I used to create my “Firdemu.”
I started with a rough sketch of what I had in mind.
- 1″ plastic curved electrical conduits
- 5′ of 1″ PVC Pipe
- 1″ 90º PVC elbows
- 1″45º PVC elbows
- 1″ PVC coupling
- 1″PVC slip caps
- Hack saw

For each leg I cut 4 pieces of PVC pipe.
12″ for the upper leg
10″ for the lower leg two 3″ pieces for the ankle and hip.
An additional 4″ piece was cut to join the legs together.

I used a 45º elbow to attach the upper and lower leg pieces together and two more 45º elbows to attach the hip and ankle.
A slip cap was attached at the bottom of each leg.
Finally a 90º elbow was attached to each hip then the legs were joined together by the remaining 4″ piece of PVC.

I glued the legs together with a hot melt glue gun and attached them to a board.

To secure the front leg I drilled a hole through the board and slip cap.
Next I attached them together with a nut and bolt.
I then reattached the leg into the slip cap and glued it together.

For the body I used a huge balloon covered in about 10 to 12 layers of papier mache’ strips.
It is 41 inches in circumference.

My next step was to make a neck piece.
For this I used several pieces of gourds from my garden and an empty spool of serger thread.

The neck piece was attached to the to the smaller end of the body with hot glue.

Since the body was hollow I needed to fill it somehow to give it strength.
I went to the hardware store and found a product called ‘Great Stuff’.
It is a foam insulation product and expands to three times it’s size.

I cut an opening in the lower body and sprayed in two cans of the”Great Stuff”.
It is terribly messy.
Here is what two cans worth did.

Here it is 24 hours later, after expanding.
“Great Stuff” really isn’t meant to fill this large a cavity.
It dried on the outside faster than it did on the inside, causing some of the sticky, gooey product to be trapped inside.

This is a sketch of how I attached the body to the legs.
The idea… Drill a hole in the top of the body as a starter and stick a dowel rod all the way through.
Next, drill a hole in the leg frame.
Attach the two together with the dowel rod.
This gave enough stability to hold the two together until I could add more layers of papier mache’.

My husband volunteered to drill the holes.
I held onto the Firdemu’s body who… still headless… hadn’t a clue as to what was going on.
As soon as he began to drill the wet ‘Great Stuff’ that was trapped inside and under pressure spewed out of the top.
The spinning of the drill distributed this gooey sticky foam stuff all over my studio before we had a chance to stop.
This ‘accident’ really worked out for the best. When the Great Stuff was through oozing, it started to set up around the dowel rod that I had inserted, adding to the overall stability.

This is the body, neck base and legs complete and ready for the next stage. I put masking tape on the PVC pipe to help the papier mache strips adhere better.

I applied 7 layers of papier mache’ strips alternating between brown paper and white paper.
As I added to the body I also added strips to the head and neck.

The head is several pieces of gourds glued together, and the upper neck is a piece of electrical conduit.

For the lower neck, I attached another electrical conduit piece to the upper neck with a 1″ PVC sleeve coupling and hot glued them together.
Then two more layers of papier mache’ was added to the whole piece.
This is the basic form of the “Firdemu.”
To give you an idea of its height, the quilt behind it is made of 3″ squares. The “Firdemu” is about 60″ tall.

My next step was to smooth out the lines where the couplings, PVC and gourd pieces join.
I also needed to add some strength on his underside, so I mixed up a batch of pulp mache. For this, I used an egg carton torn up into small pieces and soaked in hot water.
I always tear my paper when making any papier mache’ strips or pulp. This is true in paper making, also. Tearing allows the fibers to stay intact and retain their original length, where cutting breaks the fibers, causing them to lose strength in the overall piece

After the pieces had soaked for several hours I put them in the blender with some additional water and hit the “liquefy” button. This was done with small amounts of torn egg carton at a time.
The pulp needed to be run through a sieve to drain off the excess water. I then added about half a cup of wallpaper paste and a quarter cup of white glue to the pulp, which I put into a Ziplock bag and mushed all together.

After the ingredients were mixed I flattened and applied it to the Firdemu.
Since my pulp was VERY sticky, I had more on me than the Firdemu, so I used a printer’s brayer and some plastic wrap to apply it. This worked out great and gave me a fairly smooth finish.

Here is the basic shape ready for the next phase.
It was a sunny day so I let him go outside for awhile to get some fresh air.

Details
The Feet or the base of the feet I used foam insulation that is manufactured to insulate plumbing pipes. It comes it two thickness.
On the top layer, I cut V-shapes to form the ridges on the ‘toes’.

I covered the foam with tiny pieces of masking tape, pulling and shaping as I went along.

Then I applied six layers of papier mache strips, allowing each layer to dry before adding the next.
These strips were very small, most of the pieces being only 1/8th-inch wide, which allowed me to get into small places.

I decided to make the ‘claws’ out of a product called Paper Clay.

The Tail
I found some electrical cable in the basement… the stuff used to wire houses.
I taped it together with duct tape making a five-strand tail.

I needed to get it bunched up and as small as possible so I could insert it into the body.
To do this I used a bench vise and really put the squeeze on it.

After I had decided where I wanted the tail to go, I cut a hole in the body, filled it with hot glue then inserted the tail.
I cut a piece of gourd to act as a sleeve and to provide additional support. This cut of gourd slid over the wires and was glued to the body.

Taking each of the five wires I spread them out, exposing the three wires inside, giving me 15 wires to work with.
The red tips shown here on the wires were temporary. They are called wire nuts and are there so I didn’t poke my eye out!
I put six or more layers of papier mache on the gourd sleeve.

The Head
At fist I liked his beak, but I felt it needed more character.
I took the end of a long-necked gourd from my garden and sawed it in half, making a new beak with an open mouth.
Then I slid it over the old beak and attached it with hot glue.
At the same time I also added half of a small papier mache’ balloon to round off his head.

Here he is with one layer of strips

The Wings
At first I wanted them outstretched but decided tucked in would be better.
I used a large balloon covered with 12+ layers of strips. Cut it in half lengthwise, trimmed them to fit then attached with hot glue.

I added three more layers of strips to the overall piece then covered him completely with a thin layer of pulp.
To get the thin layer I put the pulp between two layers of plastic.
I then used a rolling pin and two 1/4-inch thick wood strips (one on either side) to roll it out.
Here he is totally covered with his new skin.

Tail Feathers
I decided to make the tail feathers out of Lame’.
First, I cut the Lame’ into 3″ x 11″ strips, making sure that I was on the straight of grain and that the weft thread (which are the pink ones) ran crosswise, leaving the white nylon warp threads going up and down.
I marked the middle of the feather and attached a pipe cleaner with the glue gun.
Next, I glued a second Lame’ strip on top of the pipe cleaner.
I cut the two strips into a feather shape, then pulled off all the white warp threads up to the pipe cleaner leaving the feathery weft threads.

Here is his tail completely finished.
There are five wires comprised of three wires in each, and three feathers on each of those wires.
All of the electrical wires and exposed pipe cleaners were wrapped with satin ribbon.
Then pom-poms were applied to hide the ends.
His whole body was coated in Gesso then given an undercoat of purple.

The Eyes
I added the eyes, which are styrofoam balls, then started building up around them with pulp. When the pulp dried, I added some detail with the ‘Paper Clay.’ I also added a layer of ‘Paper Clay’ on the beak and sanded it smooth.

I worked a little more on his head, and added outer eyes, nostrils and a small crest

I wanted to add some feathers to the head and wings so I made some smaller ones.
I cut strips of Lame’ 1 3/4 ” x 10.” As with the other feathers, this was cut with the weft threads going across and the warp threads going up and down.
I ran a bead of ‘Tacky Glue’ down the selvage and smoothed it out with my finger.
I then laid the ‘feather’ on plastic wrap to dry.
The glue stopped the lame’ from fraying and was tacky enough to stick when I wrapped it.
When the glue was dry, I frayed the feathers up to the glue line.

I folded a 12″ pipe cleaner in half for added strength, then wrapped the frayed Lame’ strip around the pipe cleaner.
I did 48 of these

To attach the head feathers, I took a metal skewer and made some holes in his head and wings.
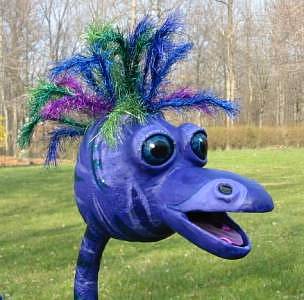
Here is the “Firdemu with his new head feathers

The finished “Firdemu”

Here he is in the backyard with Nick and the “Whatever”